The thing that always gets me the most when watching another photographer edit a photo (or a designer design something) is how differently everyone does things. And if there was ever a silver lining to the bloatiness of most Adobe apps, it’s that they present a seemingly infinite amount of ways to accomplish the same thing. One thing’s for sure, I never cease to learn something new every time I see another creative at work. Oh you do it like that? Neat!
No matter how ubiquitous the task, there are multiple ways to accomplish it. Vignetting, for example, has become a staple of my own editing workflow. It’s applied lightly but consistently across all my photos. Recently though, it occurred to me that I add vignette effects to my photos not just in one way, but in four different ways.
So today, I wanted to talk a bit about vignettes, demonstrate why they’re powerful, and show you a few different ways you can create them in Adobe Lightroom. Enjoy!
This week's challenge
How do you create and use vignette effects in your watch photography? Tag your examples with #watchstudies to share it with the community!
What is a vignette?
Let’s start with the basics. A vignette in photography describes the gradual darkening (and sometimes blurring or desaturating) of the edges of a photo. Historically, vignettes were used as decorative borders in books, but today they’re better known for the feathered effect around the periphery of photos.
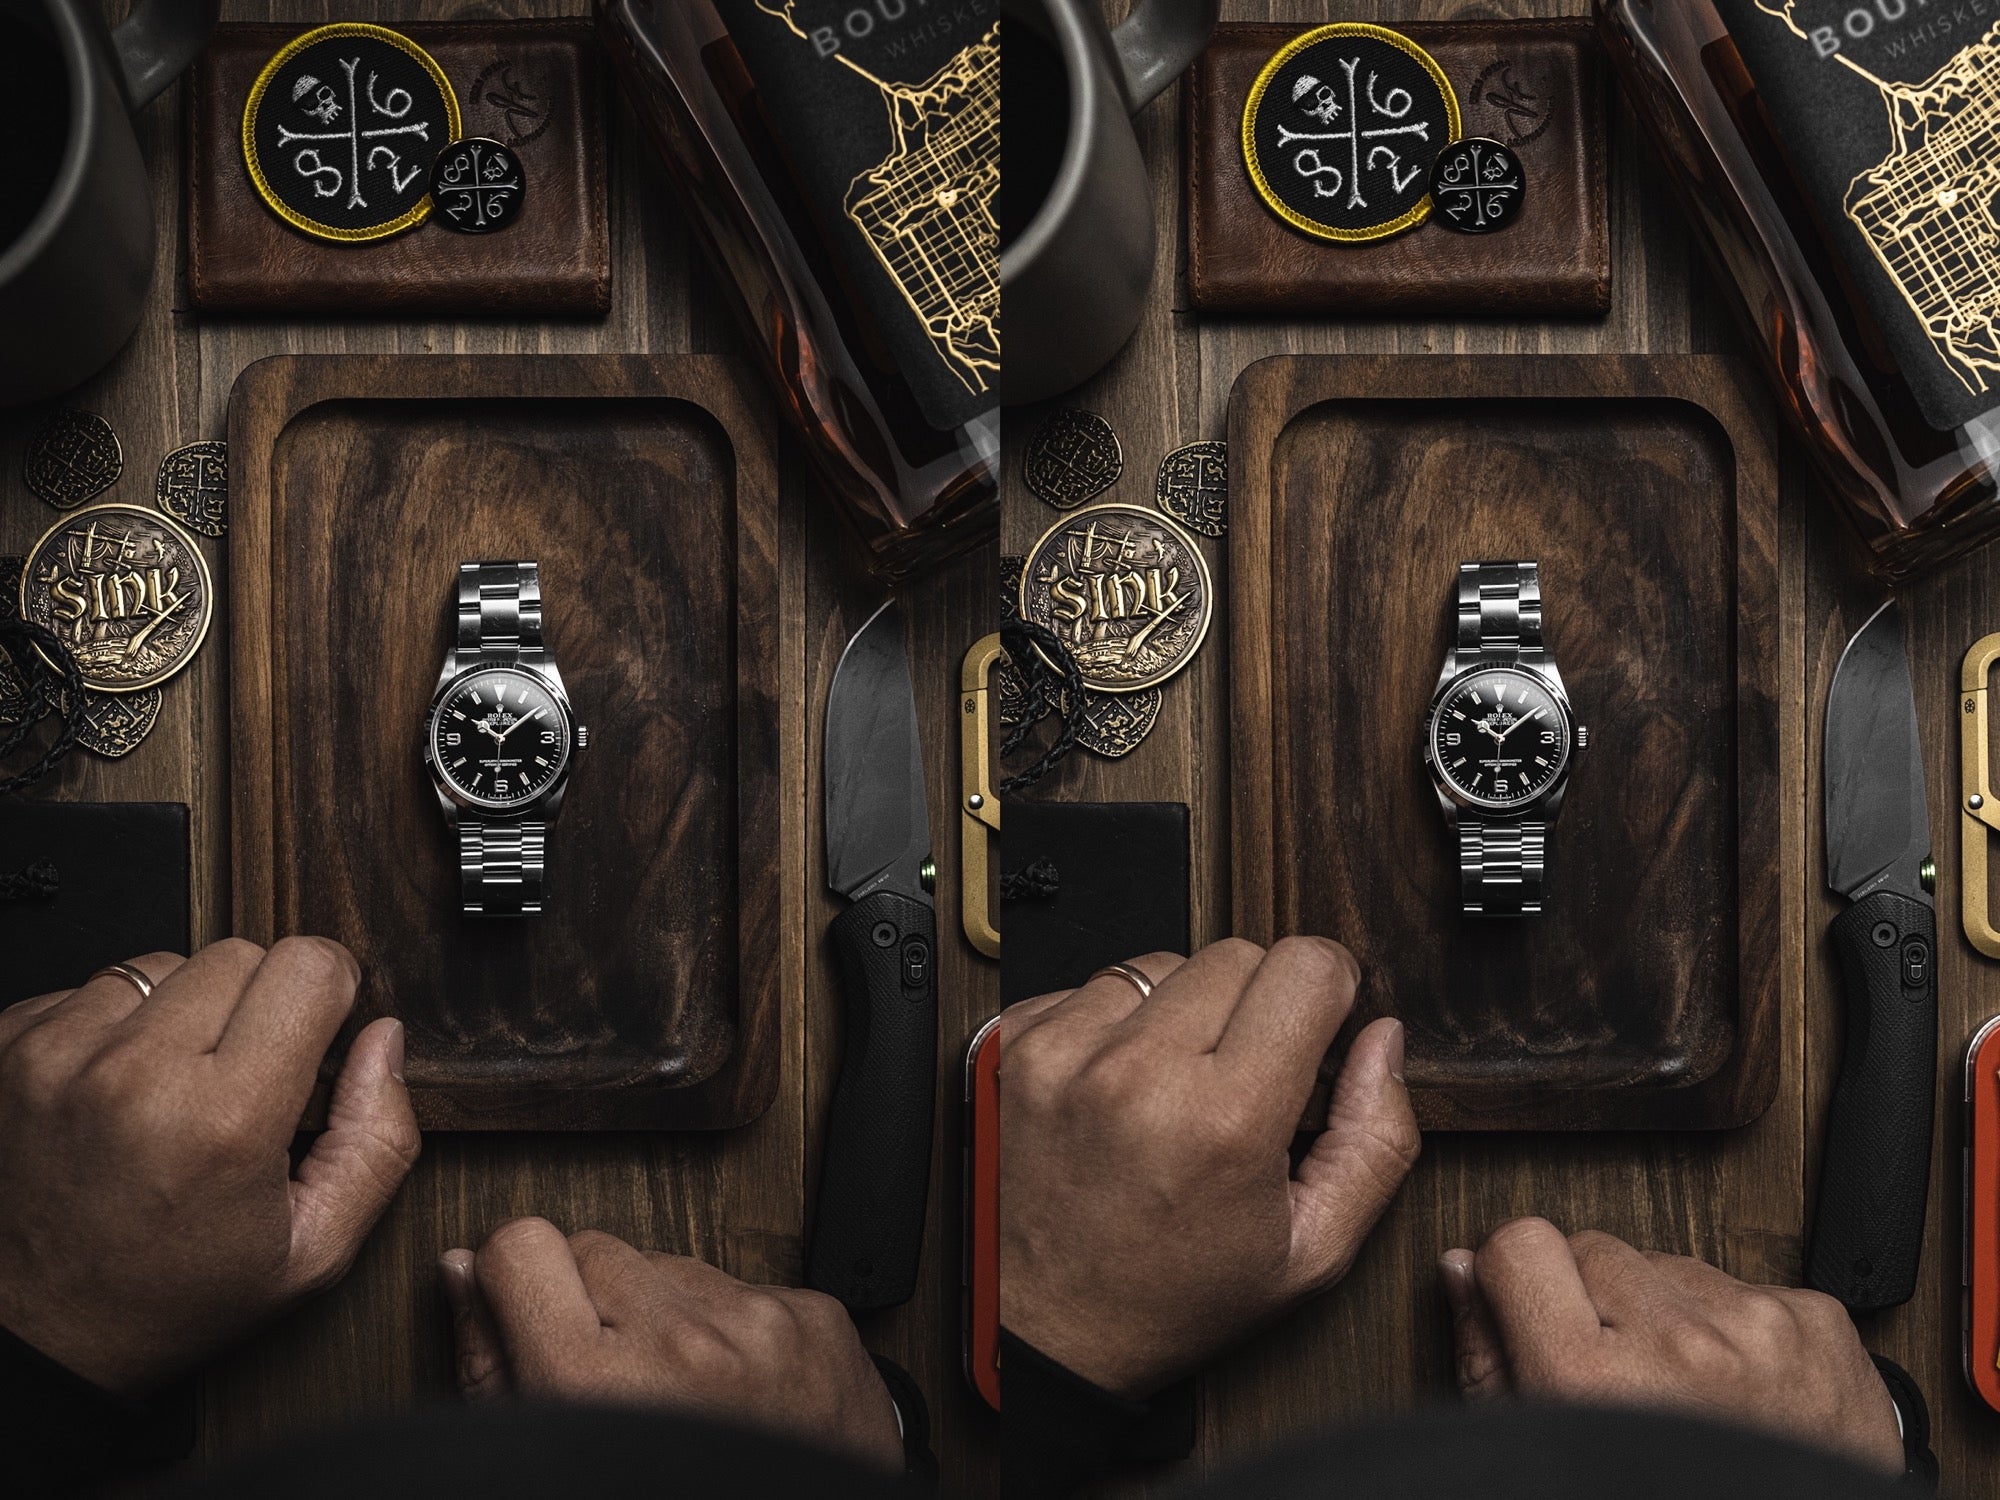 Last week's demo shot, with and without a vignette effect.
Functionally, vignettes help to draw focus toward the center of the frame given that our eyes naturally gravitate to brighter details. Even when applied lightly, a vignette can have a dramatic effect on a photo’s sense of depth and focus.
Now let’s go over 4 ways to create a vignette effect with today’s demo shot using Lightroom.
For the purposes of today’s tutorial, I've already applied some edits to the photo using my personal presets, but haven’t added any vignette effects. I'll use this as the starting point for comparison (and here it is alongside the raw photo).
Let’s dive in!
Using the Vignette setting
 You can find the Vignette slider by tapping Effects in Lightroom's toolbar.
The easiest way to add a vignette to a photo is to use the Vignette setting, which can be found under the Effects panel.
The main Vignette slider lets me control the how dark I want the vignette, with values 0 to -100 representing how black the vignette is, and values 0 to +100 representing how white the vignette is. For the purposes of creating focus in the photo, I'm going to stick to negative values here.
I can also use the Midpoint, Roundness, and Feather sliders to control the size, shape, and smoothness of the vignette, but admittedly, I leave these at their defaults values most of the time.
Here's the shot with and without the Vignette setting applied:
Using an inverted radial filter

A more advanced way to create a vignette is to use the radial filter (one of the selective adjustment tools). This is helpful when my focal point isn’t at the center of the shot or I’d like to have a bit more control over the shape and size of my vignette.
I also often use this approach when there’s a hand in my shot and I want to add a vignette effect, but I don’t want it applied to the hand.
In the case of today’s demo shot, I can use a radial filter to darken more of the background in the top half of the shot, while also darkening the foreground leading up to the watch.
To accomplish this in Lightroom, I tap Selective in the toolbar, then the plus icon in the top left, followed by the dashed circle icon (radial filter). Then, I tap and drag the circle in the desired position and shape over my photo.
 The feathering and invert settings can be found in the left toolbar when a filter is selected.
By default, the radial filter applies the effect inside the circle. To change this, I tap the invert icon to toggle the effect to be outside the circle.
With the inverted radial filter in place, I then tap Light in the toolbar, and bring the Exposure slider down until I’ve achieved the desired effect. I can also adjust the feathering setting to control how soft or harsh I want the vignetting to be.
Here's the shot with and without the vignette effect using an inverted radial filter:
Using graduated filters
At this point, I’m going to break the traditional definition of a vignette but still apply the same principle of darkening one part of the photo to bring focus to the brighter part. You might call this a unidirectional vignette of sorts.
This a great tool anytime I have a long plane leading up to your subject. Rather than keep it evenly lit, I can use a graduated filter to draw the eyes toward the subject. Similarly, I can use a graduated filter to guide the eye down a large backdrop toward the subject.
One big advantage of using graduated filters is that each filter can have its own unique adjustments. And since I can use multiple filters on one photo, I can essentially apply a vignette effect without needing all sides to be uniform.
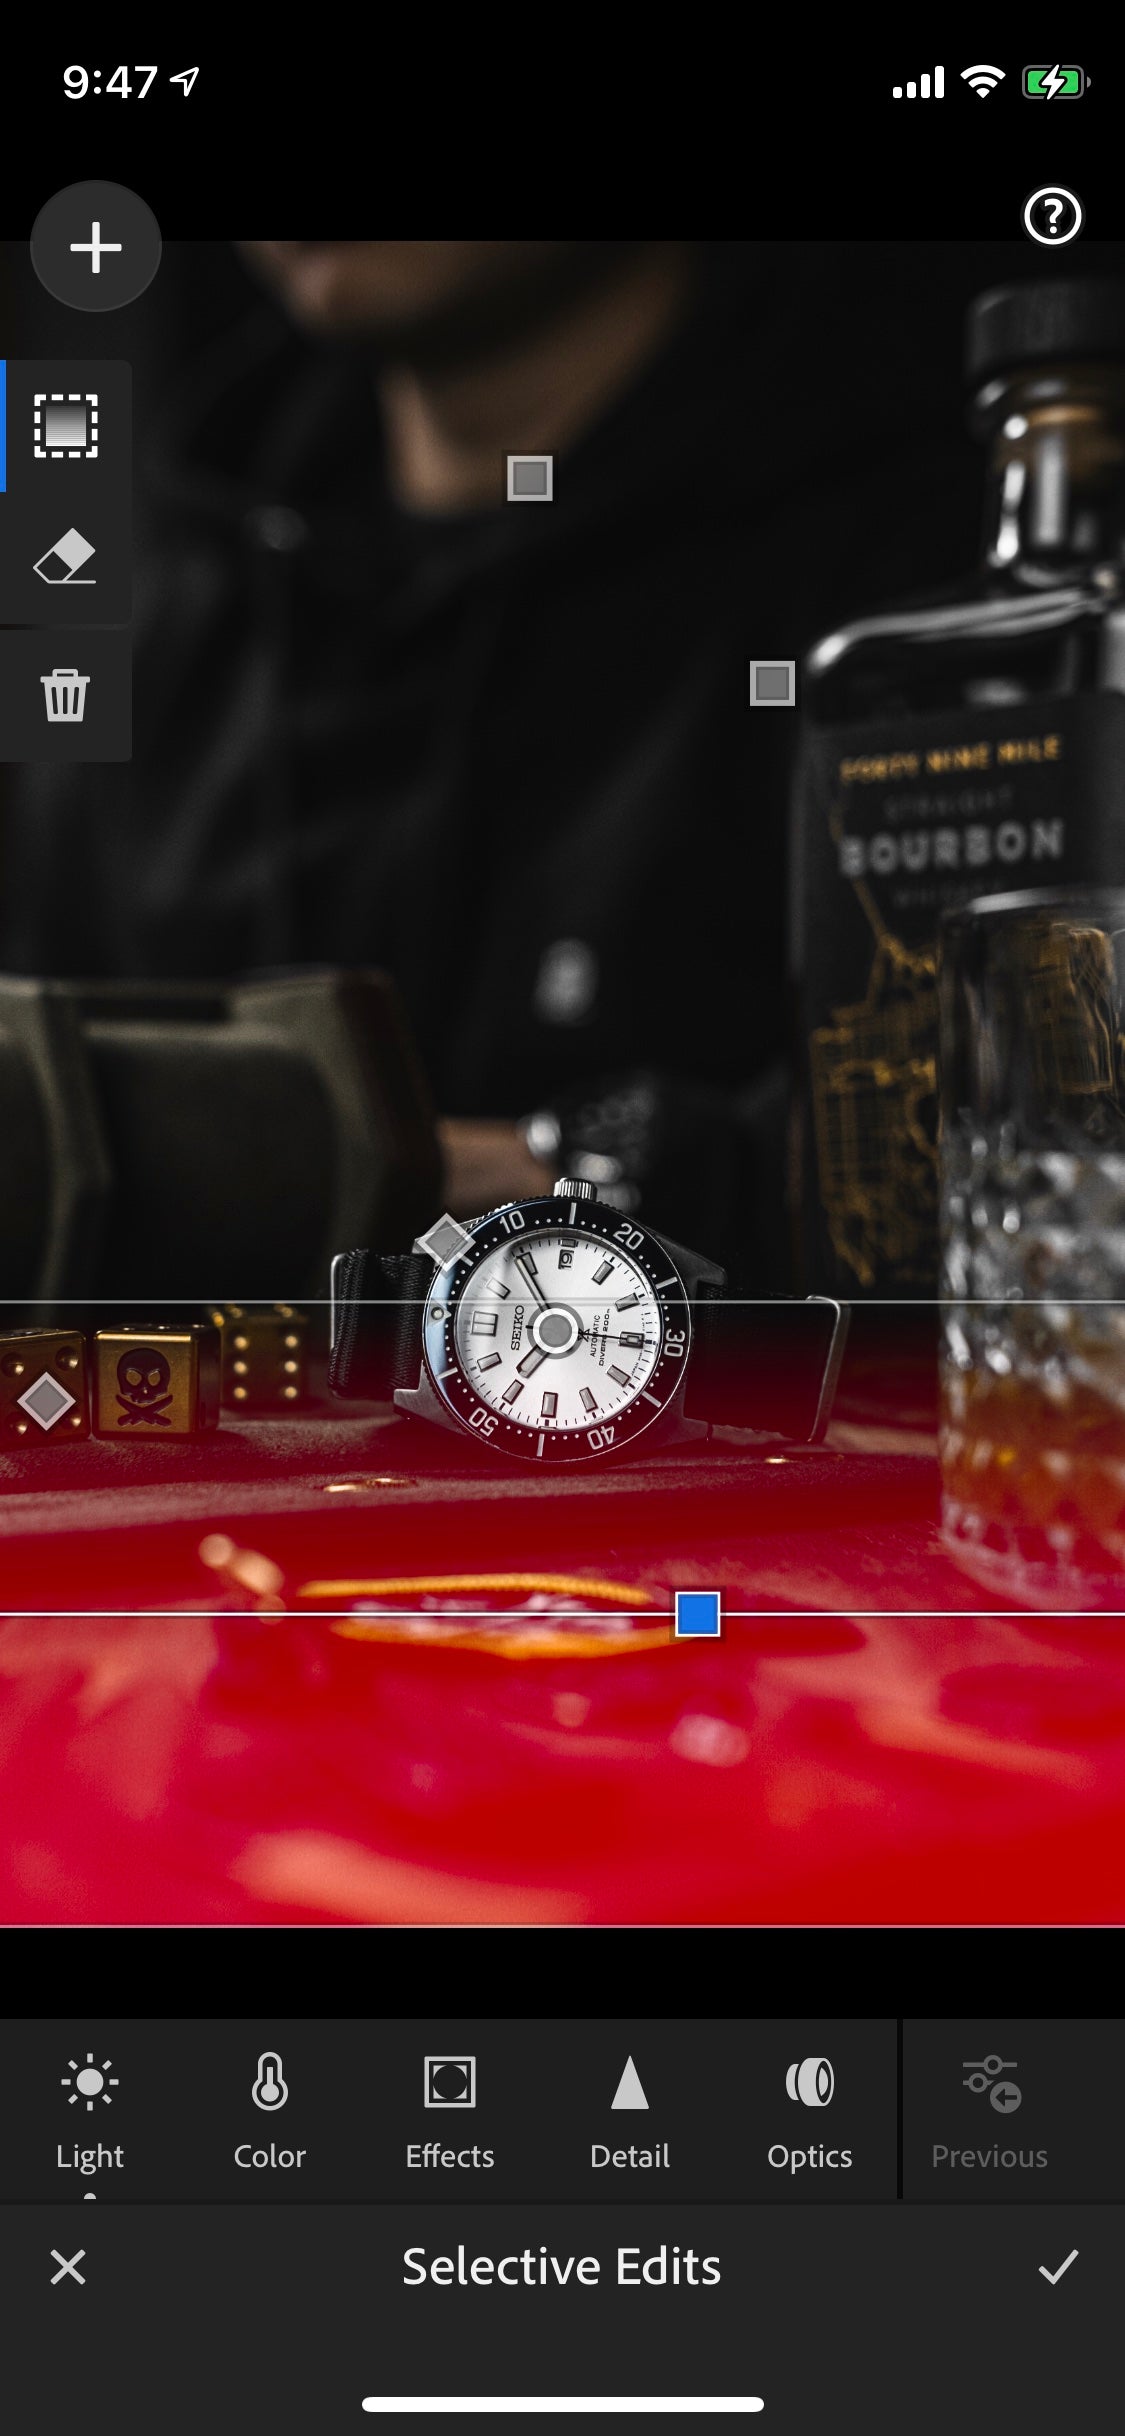
To use the graduated filter, I tap Selective in the toolbar, then the plus icon in the top left, followed by the dashed square icon (graduated filter). Then, I tap and drag the filter in the desired position and size over my photo.
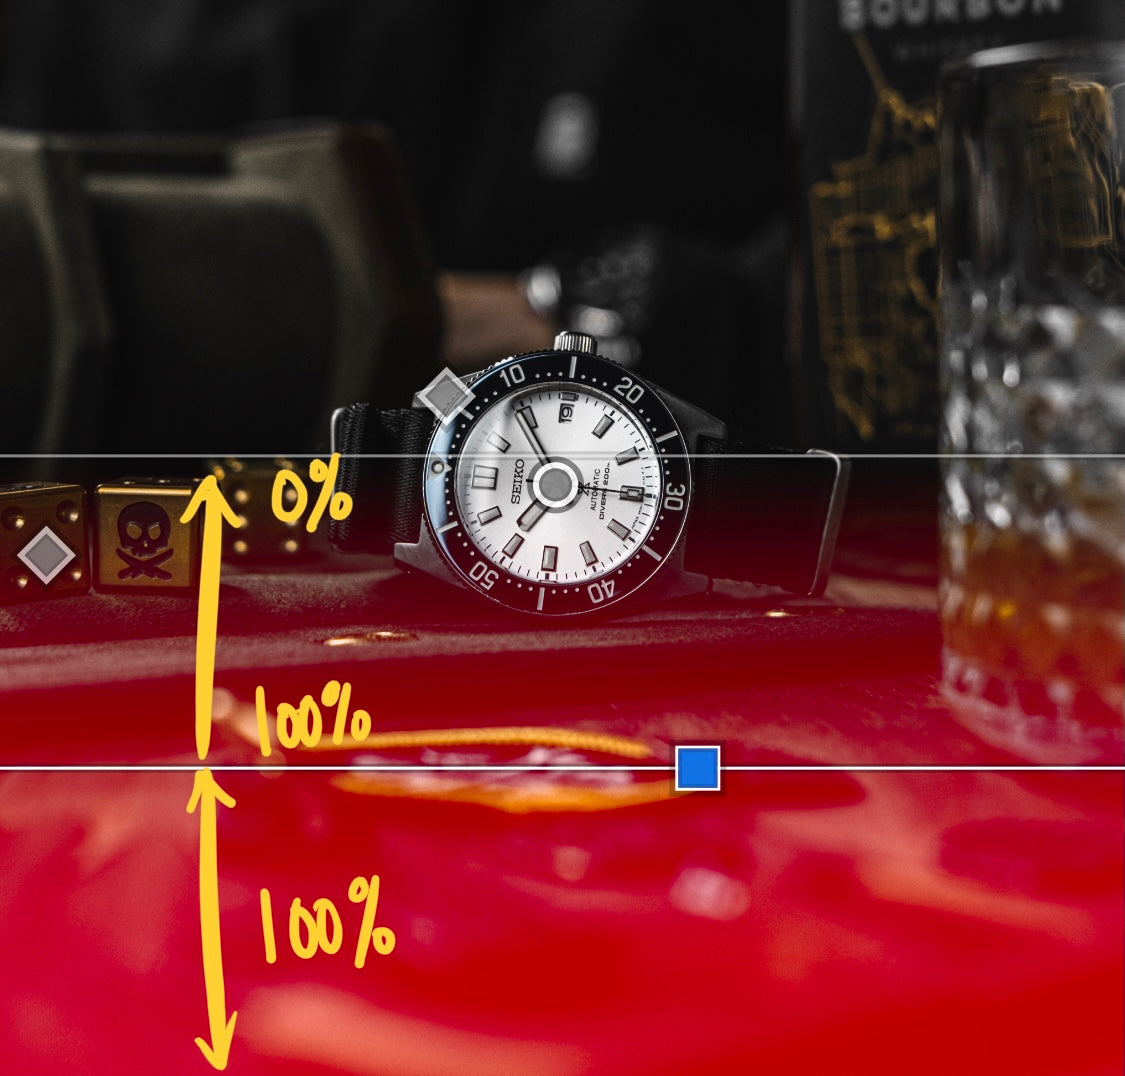 How graduated filters work.
Think of the graduated filter as a wide rectangle with a center line dividing it in two. In one half of the rectangle, the effect applied will be at 100% intensity. From the center line to the other edge of the rectangle, the intensity will gradually fade from 100% to 0%. You can also see this by observing the red overlay that shows up when the filter is selected.
With the graduated filter in place, I then tap Light in the toolbar, and bring the Exposure slider down until I’ve achieved the desired effect. Then, I can repeat the same thing to add a graduated filter to the background.
Here's the shot with and without the vignette effect using graduated filters:
I can also move the filter around by tapping and dragging the blue square, change the size of filter by dragging any of the outer edges, or change the angle of the filter by dragging the center line.
Using a radial filter
So far, I've looked at 3 different ways to darken the areas around my subject to draw focus to it. As you can imagine, I can also achieve a similar effect by brightening the subject instead.
To do this, I start by lowering the main Exposure setting of the photo. Then, I once again tap Selective in the toolbar, then the plus icon in the top left, followed by the dashed circle icon (radial filter). This time, I tap and drag it over the subject of the shot.
From there, I tap Light in the toolbar, and bring the Exposure slider up to the desired level. I may also optionally fiddle with the Highlights or other adjustments.
Note that the smaller the size of my filter is, the lighter I'll want to apply the adjustments. If I overdo it, it can also become a harsh and distracting bright spot, so just remember to use this technique with moderation. Overall, the effect should feel subtle but impactful.
Here's the shot with and without the vignette effect using a radial filter:
This approach lends itself especially well to watch photography because dials generally match the shape of the filter. That said, this works well on subjects of any shape and size.
All together
In case you missed it earlier, I can actually add as many filters as I want to the photo, while also using the Vignette setting. More often than not, I actually use a combination of all the techniques I’ve discussed today to create the final look.
Here’s another recap of the photo with each style of vignette applied.
Using the Vignette setting:

Using an inverted radial filter:

Using graduated filters:

And finally, using a radial filter:

Now, here's the final shot, this time with a combination of these techniques. Notice that the perimeter of the photo is lightly darkened (using vignette setting), while the foreground and background are individually darkened (using graduated filters), and the watch case and dial are brightened (using a radial filter).
Your turn!
How do you create and use vignette effects in your watch photography? Tag your examples with #watchstudies to share it with the community!
Thanks for joining another edition of Sunday Study Club! If you're interested in learning more, here are some related tutorials you may enjoy as well:
- How to use Selective Adjustments to improve your watch photos
- How to use the power of contrast in watch photography
- Watch this HODINKEE flatlay come to life
PS: If you've made it this far, let me know by dropping a 💢 in the comments of today's Instagram post!